When I run, I sweat. I’m not going to try to be all lady-like about it. I don’t glow or sparkle, I sweat. One thing I hate about sweating is when it gets in my eyes and drips down my face. It’s annoying and bothers me which is why I’m a big fan of the headband.
Now there are some workout headbands that are fashionable and utilized more for holding your hair out of your face. Like the headbands from sweatybands. They are super cute but personally, they are a little pricey for me and they don’t necessarily absorb my sweat. They do stay in place and keep my hair out of my face but I need something more absorbent.
Then there are the poly/cotton blend headbands like the ones made by prAna. I love these headbands but again, the price ($10 – $12) just kills me because I use 4 or 5 headbands a week. I just can’t justify plopping down $50 – $60 bucks for little pieces of material that go around your head. So, being the crafty (read frugal – read cheap ass) person that I am, I decided to take the Do It Yourself approach.
Here’s the Sweaty Chick’s easy, inexpensive, don’t need to be an expert seamstress, DIY workout headband. Warning! If you are a perfectionist seamstress, this tutorial will drive you crazy. I do a lot of eyeballing.
First, buy a third of a yard or so of POLY/COTTON blend fabric. The cotton will give you some absorbency and the polyester will give you some stretch. Make sure it is a blend…you will NOT want one or the other. 1/3 yard should give you around 6 headbands. My fabric came to $3.33 (divided by 6 = $.55 a headband!)
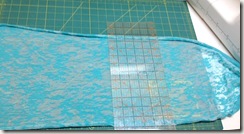
Second, figure out the length of your headband. My head measures 22” around so I made the length of my fabric 19 inches. So, figure out how big your head is and subtract a few inches. The width should be around 7.5 inches.
Third, if your fabric has a right side and a wrong side (mine did not), sew the RIGHT sides together along the top. Keep in mind the edges of this fabric have the tendency to roll so do the best you can to sew a 1/4” seam. Don’t get frustrated if it’s not straight. It doesn’t matter:
After you sew the top, you will have a “tube” thing. Turn that tube thing inside-out and you will have a nice clean seam:
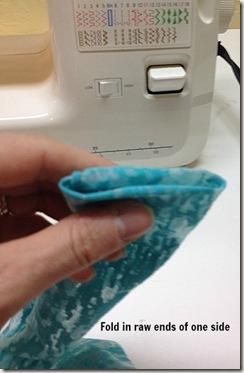
Next, take one end of the “tube” and fold the raw edges in, like so:
Take the second, unfolded end, and slip it in the folded end, like so:
Once the unfolded end is tucked inside the folded end, fold in half, like so:
Sew, like so. Make sure you get through all layers:
Then, you are done, sister! Put on your awesome, inexpensive, DIY headband and sweat away:
Have fun making headbands. It’s a great gift idea for a runner….the holidays are right around the corner 🙂


You are one crafty chick! You know what what I want for Christmas now 🙂
Wow! Who would have thought that you just made it yourself. That’s pretty! Looks like those headbands you buy in stores. 🙂 You should start your own business. 🙂
Nicely done! Thanks for sharing.
My pleasure! Thanks for reading!